Short ribs are a more expensive cut of meat. Read that I could use boneless chuck roast in place of it. Turned out delicious!! I had the butcher cut the boneless chuck roast into 1 inch strip chunks.
Short ribs (Using Boneless Chuck Roast)
Prep Time: 15 min Pressure Cook Time: 45 min + 4 min
First, I marinated the meat in some red wine (just enough to cover it). Kept it in the fridge.
Using my Instant Pot, I browned my meat on saute mode. Did this for about 8 min per side. Set meat aside.
In a bowl, mix 1 cup red wine, 1/3 cup ketchup, 1 tbsp worcheshire sauce, 1 tbsp brown sugar, some thyme (1/2 tsp?).
On saute mode again, I put some onions in. Then garlic to create more aroma. Deglaze with water/wine to make sure there are no brown bits at the bottom (so that the pot can come to pressure). Place meat on top of onions. Pour liquids in that was mixed in the bowl. Close lid.
Time to pressure cook! Set on manual for 45 min HP(high pressure). NPR for 10 min; QR.
Then put in chopped carrots and quartered potatoes. Set on manual 4 min HP. QR.
It was flavorful and enjoyable. Served it on top of veggie rotelle pasta. The sauce tastes awesome.
Enjoy!!!
Healthy meets Delicious.. They fall in LOVE!! ;) *Click on the pictures to enlarge.
Showing posts with label Dinner. Show all posts
Tuesday, January 16, 2018
Wednesday, October 11, 2017
Gobble!! Gobble!! (Pressure Cook: Turkey Breast)
It was Canadian Thanksgiving a couple days ago. Seeing posts of Thankgiving recipes made me want to make turkey. Thought I'd give it a shot after some research.
Bought a bone-in half turkey breast which just fit in my 6 quart IP (Instant Pot).
Bone In Half Turkey Breast
Ingredients:
Bone in half turkey breast
1 cup broth
celery stalk
onion (chopped)
Some butter (Optional if you are browning your breast)
Directions:
Season your half turkey breast. I sprinkled sea salt, pepper, garlic powder, onion powder, thyme, rosemary. Brown first to get some color. Press 'Saute' set to medium. Place butter in the pot (I used 3 Tbsp since it was leftover from a stick). Place turkey in breast side down. I did not touch it for 6 minutes. Then press "Cancel". Remove the turkey.
Add 1 cup broth (or water) to deglaze (make sure nothing is stuck at the bottom of the pot). Throw in chopped celery and onion. Put the turkey back breast side up.
Close the lid. Set your Pressure Cooker on Manual 20 min HP. Time will depend on how many pounds your bone in turkey breast is. Mine was 2.5 lbs, so I set it for 20 min. If yours is bigger, set it for more time. Natural pressure release after it is done.
To make the gravy, mix 3 Tbsp flour (or cornstarch) and 3 Tbsp water together. Whisk it into the IP which already has broth, celery, onions. Add more flour as needed to desired thickness.
Enjoy!!
Notes:
Photo also includes carrot-potato mash (made it as an experiment but regular mashed potatoes taste so much better!)
Bought a bone-in half turkey breast which just fit in my 6 quart IP (Instant Pot).
Bone In Half Turkey Breast
Ingredients:
Bone in half turkey breast
1 cup broth
celery stalk
onion (chopped)
Some butter (Optional if you are browning your breast)
Directions:
Season your half turkey breast. I sprinkled sea salt, pepper, garlic powder, onion powder, thyme, rosemary. Brown first to get some color. Press 'Saute' set to medium. Place butter in the pot (I used 3 Tbsp since it was leftover from a stick). Place turkey in breast side down. I did not touch it for 6 minutes. Then press "Cancel". Remove the turkey.
Add 1 cup broth (or water) to deglaze (make sure nothing is stuck at the bottom of the pot). Throw in chopped celery and onion. Put the turkey back breast side up.
Close the lid. Set your Pressure Cooker on Manual 20 min HP. Time will depend on how many pounds your bone in turkey breast is. Mine was 2.5 lbs, so I set it for 20 min. If yours is bigger, set it for more time. Natural pressure release after it is done.
To make the gravy, mix 3 Tbsp flour (or cornstarch) and 3 Tbsp water together. Whisk it into the IP which already has broth, celery, onions. Add more flour as needed to desired thickness.
Enjoy!!
Notes:
Photo also includes carrot-potato mash (made it as an experiment but regular mashed potatoes taste so much better!)
Friday, June 9, 2017
Bulgogi Rice
I've been searching and searching for different dishes to serve for dinner. When you cook daily, it's easy to have the same things over and over again.
This is the easiest and tastiest recipe I've found in a long time!!! Bulgogi Rice is bulgogi meat using ground beef instead.
Bulgogi Rice
Prep Time: 2 minutes Cook Time: 5 (?) minutes minus making rice
Ingredients
1 lb ground beef
3 cloves garlic (minced)
1/4 cup soy sauce
1/4 cup brown sugar
a little ginger chopped finely
1 Tbsp sesame oil
1/2 tsp black pepper
1 cup rice
green onions (optional)
sesame seeds (optional)
Directions:
Cook your rice separately. I put one cup jasmine rice with water in my pressure cooker (Instant Pot) for 3 min (then NPR 10 min).
In a pan, cook ground beef and garlic. Add black pepper. Cook until browned.
In a separate medium sized bowl, mix soy sauce, brown sugar, ginger, sesame oil. Pour this mixture into the pan. Mix. THAT'S IT!!!
Get a bowl of rice, put the bulgogi ground beef over it. Top it with green onions and sesame seeds, if desire.
DELICIOUS, EASY, FAST!! What more could you ask for??
Well, I will double the recipe next time since we gobbled it up.
ENJOY!!
Note: I usually stir fry some kind of veggies on the side to create balanced meals (mushrooms, green beans, zucchini)
Labels:
Beginner,
Best,
Dinner,
Easy,
Ground beef,
Healthy,
Kid-Friendly,
Lunch,
Meat,
Recipe
Friday, April 7, 2017
Pressure Cooker: Unstuffed Cabbage (with Meat)
I had cabbage, ground beef, ground pork. Browsing the web to see what I should make, I came across Unstuffed Cabbage as the perfect recipe for the ingredients.
Unstuffed Cabbage w/Meat
Prep Time: 10 min Cook Time: 5 min
Ingredients:
1 lb ground beef
1 lb ground pork
1 large onion (sliced)
4 cloves garlic
26 oz diced canned tomatoes (you can use fresh also)
2 Tbsp brown sugar
1 Tbsp paprika
1 Tbsp dijon mustard
3 Tbsp vinegar
1 cabbage (chopped)
1/2 tsp salt
1/2 tsp pepper
Directions:
Push the 'Saute' button and cook the ground beef and ground pork. Add the onion to cook with the meat. Add the rest of the ingredients (add the cabbage last).
On 'Manual' mode, set to cook on high pressure for 5 minutes. You can quick release or wait about a half hour for natural pressure release. I wasn't in a hurry so this time I used natural release.
Open lid. Stir to mix everything well. Taste to see if you need to add any more salt/pepper.
Enjoy!!
Wednesday, April 5, 2017
Pressure Cooker: One Pot Pasta
I sift through many, many recipes before trying any of them. Finally tried One-Pot Pasta. It was a hit. I see why people do lasagna pie in the pressure cooker. Still need to buy a pan for that to keep it together.
One Pot Pasta
Prep Time: 10 min Cook Time: 6 min (Long time to get to pressure)
Ingredients:
1 lb ground beef (or other meat, even veggies like mushrooms/tomatoes)
1 onion (diced or chopped)
2 cloves garlic (minced)
1 box pasta
1 jar pasta sauce
1 jar water
Directions:
Turn on your electric pressure cooker. Hit 'Saute' button to brown the ground beef. Add the onions. Then the garlic (for a min). Press 'Cancel'
Pour in dry pasta (any kind); I used a bigger macaroni. Pour in jar of pasta sauce. Fill the same jar with water to add. This eliminates washing a measuring cup!
Stir to mix ingredients. Close/Lock the lid. Make sure your knob is on 'Seal'. Then I was set.
When you are ready (I waited for my husband to get home), hit 'Manual' (high pressure) for half the time it takes to cook pasta. Mine said 10-12 min. I set it for 6 minutes.
It did take 20+ minutes to make it to high pressure because of the amount of liquid. After 6 minutes of high pressure, hit 'keep warm/cancel' so that you don't keep cooking it. When I turned the knob to 'vent', there was no pressure since I had it on keep warm.
Enjoy!!
One Pot Pasta
Prep Time: 10 min Cook Time: 6 min (Long time to get to pressure)
Ingredients:
1 lb ground beef (or other meat, even veggies like mushrooms/tomatoes)
1 onion (diced or chopped)
2 cloves garlic (minced)
1 box pasta
1 jar pasta sauce
1 jar water
Directions:
Turn on your electric pressure cooker. Hit 'Saute' button to brown the ground beef. Add the onions. Then the garlic (for a min). Press 'Cancel'
Pour in dry pasta (any kind); I used a bigger macaroni. Pour in jar of pasta sauce. Fill the same jar with water to add. This eliminates washing a measuring cup!
Stir to mix ingredients. Close/Lock the lid. Make sure your knob is on 'Seal'. Then I was set.
When you are ready (I waited for my husband to get home), hit 'Manual' (high pressure) for half the time it takes to cook pasta. Mine said 10-12 min. I set it for 6 minutes.
It did take 20+ minutes to make it to high pressure because of the amount of liquid. After 6 minutes of high pressure, hit 'keep warm/cancel' so that you don't keep cooking it. When I turned the knob to 'vent', there was no pressure since I had it on keep warm.
Enjoy!!
Friday, March 31, 2017
Pressure Cooker: BBQ Baby Back Ribs
I made baby back ribs in my Instant Pot pressure cooker. It wasn't as fast as I thought it would be since it was BBQ Baby Back Ribs that needed NPR (Natural Pressure Release).
This is how much time it took:
13 min - to get IP to reach high pressure
25 min - IP manual high pressure
25 min - NPR
15 min - oven to finish
The result was good but not nearly as tasty as my usual oven low and slow 3 hr version.
Pressure Cooker BBQ Baby Back Ribs (3 lbs)
Generously sprinkle rub (or just season with salt/pepper). Pour one cup cold water into the pot. Place the trivet in. Ribs go in. Make sure IP valve is on "sealing". Close and set it on Manual High Pressure for 25 minutes.
Natural pressure release as I have read that you don't want to do a quick release with meat. This takes about 25 minutes. Then take the ribs out to transfer to a baking dish. Brush ribs with BBQ sauce. Finish in the oven at 450F for 15 min. (*Note: Butcher cut it the wrong way..duh. That is why the pieces are small.)
1.5 hr versus 3 hr. I think I would still do "slow and low" in the oven. Will have to try different recipes that don't to finish in the oven. Or maybe 10 min NPR is okay too? Going to experiment again..
This is how much time it took:
13 min - to get IP to reach high pressure
25 min - IP manual high pressure
25 min - NPR
15 min - oven to finish
The result was good but not nearly as tasty as my usual oven low and slow 3 hr version.
Pressure Cooker BBQ Baby Back Ribs (3 lbs)
Generously sprinkle rub (or just season with salt/pepper). Pour one cup cold water into the pot. Place the trivet in. Ribs go in. Make sure IP valve is on "sealing". Close and set it on Manual High Pressure for 25 minutes.
Natural pressure release as I have read that you don't want to do a quick release with meat. This takes about 25 minutes. Then take the ribs out to transfer to a baking dish. Brush ribs with BBQ sauce. Finish in the oven at 450F for 15 min. (*Note: Butcher cut it the wrong way..duh. That is why the pieces are small.)
1.5 hr versus 3 hr. I think I would still do "slow and low" in the oven. Will have to try different recipes that don't to finish in the oven. Or maybe 10 min NPR is okay too? Going to experiment again..
Saturday, February 25, 2017
Pressure Cooker / Instant Pot Recipe #2: Pot Roast w/Carrots and Potatoes
When I bought Instant Pot, I thought that I could cook anything in very little time. Well, Pot Roast took much longer. You will need 1.5 hours.
Pot Roast
Prep: 40 min Cook Time: 45 (beef) + 4 (veggies) min Other: 5 min (cut beef, make gravy)
** EDIT: Second time: Cut prep time by 10 min. IP reached high pressure after 5 min. **
Natural pressure release. Luckily, we had an appointment at that time. When we returned home, the Instant Pot had released all the pressure. Made the gravy by adding flour.
Ingredients:
2-3 lbs boneless chuck roast (it should be about 2 inches thick
1 Tbsp olive oil
4 cloves garlic
1 large onion (sliced)
1 cup chicken broth
2 Tbsp soy sauce
1/2 tsp rosemary
1/2 tsp thyme
1/2 lb carrots (you can put more)
2 lb potatoes (you can put more)
1.5 Tbsp flour (for gravy at the end)
Directions:
My prep time was 40 min since I included searing the beef also.
First, you sear the beef. Pour olive oil. Hit the 'Saute' button on your Instant Pot. Sear all sides (8-10 min each side). Remove beef from heat to set aside. Press cancel.
Before:
After searing:
Hit the 'Saute' button again but set it on medium heat for onions/garlic. Cook onions for a minute or two, then garlic. For deglazing, splash some red wine in. I love to use frozen garlic cloves so that I can have it on hand.
Add chicken broth, soy sauce, rosemary, thyme in. Place your beef back in. Close the lid.
Pressure cook on high for 45 minutes. Natural release pressure for half an hour.
Beef after pressure cooking:
Remove beef to a set aside. Add potatoes, then carrots. Pressure cook for 4 minutes. Quick release pressure.
Now to make the gravy.. Add flour and stir. Salt and pepper to taste.
Cut your beef. Spoon some gravy on top. I placed veggies on the side.
Enjoy!!
Pot Roast
Prep: 40 min Cook Time: 45 (beef) + 4 (veggies) min Other: 5 min (cut beef, make gravy)
** EDIT: Second time: Cut prep time by 10 min. IP reached high pressure after 5 min. **
Natural pressure release. Luckily, we had an appointment at that time. When we returned home, the Instant Pot had released all the pressure. Made the gravy by adding flour.
Ingredients:
2-3 lbs boneless chuck roast (it should be about 2 inches thick
1 Tbsp olive oil
4 cloves garlic
1 large onion (sliced)
1 cup chicken broth
2 Tbsp soy sauce
1/2 tsp rosemary
1/2 tsp thyme
1/2 lb carrots (you can put more)
2 lb potatoes (you can put more)
1.5 Tbsp flour (for gravy at the end)
Directions:
My prep time was 40 min since I included searing the beef also.
First, you sear the beef. Pour olive oil. Hit the 'Saute' button on your Instant Pot. Sear all sides (8-10 min each side). Remove beef from heat to set aside. Press cancel.
Before:
After searing:
Hit the 'Saute' button again but set it on medium heat for onions/garlic. Cook onions for a minute or two, then garlic. For deglazing, splash some red wine in. I love to use frozen garlic cloves so that I can have it on hand.
Add chicken broth, soy sauce, rosemary, thyme in. Place your beef back in. Close the lid.
Pressure cook on high for 45 minutes. Natural release pressure for half an hour.
Beef after pressure cooking:
Remove beef to a set aside. Add potatoes, then carrots. Pressure cook for 4 minutes. Quick release pressure.
Now to make the gravy.. Add flour and stir. Salt and pepper to taste.
Cut your beef. Spoon some gravy on top. I placed veggies on the side.
Enjoy!!
Friday, February 17, 2017
FIRST TIME USING MY INSTANT POT (Honey Garlic Chicken)
For Black Friday 2016, I only had one thing I was eyeing to buy since I had been wanting for for months...an Instant Pot. It arrived a week later. Then the box sat in the closet through the holidays while we were away. My goal was to use it by the end of January. Well, mid-February rolled around, it was still in the box until today...
I had been afraid to use it. Woke up this morning and told myself that today was the day I was going to tackle my new appliance. The manual felt thick until I read it realizing that it was that way since it was translated into several different languages (otherwise it would have been thin).
Still unsure of what to make but knowing that it was going to be chicken for the first recipe. I defrosted chicken in the sink during the day (But you can cook frozen chicken in Instant Pot too). Kept reading that it would be done in 5 minutes. Ended up taking much longer than anticipated. Dinner was fairly late for us as a result. Chicken was flavorful and tender but not something I couldn't make in comparable time. Felt that I was extra cautious since it was my FIRST TIME with my Instant Pot.
Yes, it takes 5 minutes on high pressure to make chicken but I set it on 8 minutes since I had 8 chicken thighs that were thick. Used two functions for my dish: 1) Saute 2) Poultry.
Honey Garlic Chicken (Using Instant Pot)
Ingredients:
2-3 lbs Chicken Thighs
salt and pepper to season OR dry rub
1/2 cup water
1/2 cup honey
1/2 cup soy sauce
1/4 cup ketchup
5 cloves garlic, chopped/minced
1 tsp basil
olive oil (for saute)
1 lb carrots
Directions:
Sprinkle dry rub on both sides of the chicken thighs (or just use salt and pepper).
In a separate bowl, mix water, honey, soy sauce, ketchup, garlic, basil.
Plug in your Instant Pot. With the lid off, put some olive oil to brown the chicken. Push the 'Saute' button. Cook chicken for a minute each side. Place it on a plate when done (found that I could brown 2-3 chicken thighs at a time due to space).
Put browned chicken thighs back into Instant Pot. The carrots will go on top of the chicken. Pour liquids from the separate bowl. Place and lock Instant Pot lid. Make sure the top of your pot is set to 'Sealed' (not 'Vent').
Push the 'Poultry' button. I set it on 8 minutes (recipe called for 5 minutes) since my chicken pieces were thicker.
Done.
I stood there staring at it for 5 minutes afraid to change the 'Sealed' to 'Vent' for quick pressure release. Moved it a little at a time for slow pressure release (my first time!!). Ended up switching to 'Vent' by using a spoon instead since I didn't want to get too close.
The result was tender chicken. Started with a simple chicken dish to test the waters.
How was your FIRST TIME using your Instant Pot?? What recipe did you use?
Notes:
1) It didn't take just 8 minutes since it takes time to reach high pressure.
2) When you saute, you cook like you normally do in a pan.
3) Easy to use but I was still nervous since I had heard stories of people putting holes in their ceilings with pressure cookers.
I had been afraid to use it. Woke up this morning and told myself that today was the day I was going to tackle my new appliance. The manual felt thick until I read it realizing that it was that way since it was translated into several different languages (otherwise it would have been thin).
Still unsure of what to make but knowing that it was going to be chicken for the first recipe. I defrosted chicken in the sink during the day (But you can cook frozen chicken in Instant Pot too). Kept reading that it would be done in 5 minutes. Ended up taking much longer than anticipated. Dinner was fairly late for us as a result. Chicken was flavorful and tender but not something I couldn't make in comparable time. Felt that I was extra cautious since it was my FIRST TIME with my Instant Pot.
Yes, it takes 5 minutes on high pressure to make chicken but I set it on 8 minutes since I had 8 chicken thighs that were thick. Used two functions for my dish: 1) Saute 2) Poultry.
Honey Garlic Chicken (Using Instant Pot)
Ingredients:
2-3 lbs Chicken Thighs
salt and pepper to season OR dry rub
1/2 cup water
1/2 cup honey
1/2 cup soy sauce
1/4 cup ketchup
5 cloves garlic, chopped/minced
1 tsp basil
olive oil (for saute)
1 lb carrots
Directions:
Sprinkle dry rub on both sides of the chicken thighs (or just use salt and pepper).
In a separate bowl, mix water, honey, soy sauce, ketchup, garlic, basil.
Plug in your Instant Pot. With the lid off, put some olive oil to brown the chicken. Push the 'Saute' button. Cook chicken for a minute each side. Place it on a plate when done (found that I could brown 2-3 chicken thighs at a time due to space).
Put browned chicken thighs back into Instant Pot. The carrots will go on top of the chicken. Pour liquids from the separate bowl. Place and lock Instant Pot lid. Make sure the top of your pot is set to 'Sealed' (not 'Vent').
Push the 'Poultry' button. I set it on 8 minutes (recipe called for 5 minutes) since my chicken pieces were thicker.
Done.
I stood there staring at it for 5 minutes afraid to change the 'Sealed' to 'Vent' for quick pressure release. Moved it a little at a time for slow pressure release (my first time!!). Ended up switching to 'Vent' by using a spoon instead since I didn't want to get too close.
The result was tender chicken. Started with a simple chicken dish to test the waters.
How was your FIRST TIME using your Instant Pot?? What recipe did you use?
Notes:
1) It didn't take just 8 minutes since it takes time to reach high pressure.
2) When you saute, you cook like you normally do in a pan.
3) Easy to use but I was still nervous since I had heard stories of people putting holes in their ceilings with pressure cookers.
Sunday, January 4, 2015
Easy Butternut Squash Soup
While at Trader Joe's the other week, I saw that the squashes were $1.79 each. So I'm looking to find the biggest squash since it's not by the pound. A nice employee helped me. She exclaimed, "I think I FOUND IT!!"
Most good-sized butternut squashes are about 2.5 lbs. Well, mine was 7 lbs!!! WOW..
People would see the squash in my cart and comment on how huge it was. (I actually didn't take a photo of it before chopping it up.)
Now, cutting off the ends/skin, scooping out the seeds, and chopping it into smaller pieces was such a chore. It took 45+ min just to do that. The gigantic butternut squash produced tons of flesh to the point where I had to change pots because it was overflowing.
Easy Butternut Squash
Prep Time: 30 min Cook Time: 35 min
(But obviously my prep time was doubled due to the 7 lb squash)
Ingredients:
3 lbs butternut squash, chopped
1 medium onion, chopped
1 red bell pepper, chopped
3 cloves of garlic
2 cups chicken broth (1 can)
water, enough to cover veggies (about 6 cups)
1 Tbsp salt
2 Tbsp sugar
1/2 cup heavy cream
Combine all ingredients except for the heavy cream. Cook covered on medium heat for 35 minutes. You may need to cook it longer if the veggies are not tender by then.
Pour the soup mixture into a food processor or blender. Mine didn't fit so I had to do it in batches. I poured the soup mixture in with a little heavy cream at a time. Then blended it. Once I finished my puree, I would dump it into a pot. When you have a whole pot of pureed soup, heat it through on medium heat.
This soup is tasty, packed with vitamins; it'll warm you up on a cold, winter day.
Enjoy!!
Most good-sized butternut squashes are about 2.5 lbs. Well, mine was 7 lbs!!! WOW..
People would see the squash in my cart and comment on how huge it was. (I actually didn't take a photo of it before chopping it up.)
Now, cutting off the ends/skin, scooping out the seeds, and chopping it into smaller pieces was such a chore. It took 45+ min just to do that. The gigantic butternut squash produced tons of flesh to the point where I had to change pots because it was overflowing.
Easy Butternut Squash
Prep Time: 30 min Cook Time: 35 min
(But obviously my prep time was doubled due to the 7 lb squash)
Ingredients:
3 lbs butternut squash, chopped
1 medium onion, chopped
1 red bell pepper, chopped
3 cloves of garlic
2 cups chicken broth (1 can)
water, enough to cover veggies (about 6 cups)
1 Tbsp salt
2 Tbsp sugar
1/2 cup heavy cream
Combine all ingredients except for the heavy cream. Cook covered on medium heat for 35 minutes. You may need to cook it longer if the veggies are not tender by then.
Pour the soup mixture into a food processor or blender. Mine didn't fit so I had to do it in batches. I poured the soup mixture in with a little heavy cream at a time. Then blended it. Once I finished my puree, I would dump it into a pot. When you have a whole pot of pureed soup, heat it through on medium heat.
This soup is tasty, packed with vitamins; it'll warm you up on a cold, winter day.
Enjoy!!
Wednesday, July 23, 2014
Mac n Cheese for ONE
Most of the time, I cook for two. But cooking for one is doable too. Most people are too lazy to cook for one, not I.
I am modifying my Macaroni and Cheese recipe so that you can make just one portion. I'm not an environmentalist but if you see the way I live, you would think that I was. Don't like to waste foil, saran wrap for leftovers. That's why I usually cook JUST ENOUGH.
Mac n Cheese for ONE
Prep Time: 0 min Cook Time: 15 min
Ingredients:
1/2 + cup of macaroni (or other pasta)
1/2 cup milk
1 tbsp flour
1/2 cup shredded cheese
a dash of garlic salt (to taste)
Directions:
Fill a small pot with water and boil on stovetop. When the water boils, throw in the pasta (this can take 7-12 min according to the kind of pasta you use). Strain when done.
While pasta is cooking, whisk milk and flour until there are no lumps. Use the same pot (after you cook pasta) to pour the milk+flour mixture. On medium heat, stir the mixture until it thickens, about 1-2 minutes. Mix in cheese and garlic salt. When cheese melts, mix in the pasta. Done!
Modifications:
Spinach Mac n Cheese - Add frozen spinach after the sauce thickens (before adding cheese)
Bacon Mac n Cheese - Add bacon after the sauce thickens (before adding cheese)
The possibilities are endless...
Notes:
I use a little more than 1/2 cup pasta. You could put in 2/3 cup pasta also.
If you are a big eater, you might want to just make half of the regular recipe instead.
I am modifying my Macaroni and Cheese recipe so that you can make just one portion. I'm not an environmentalist but if you see the way I live, you would think that I was. Don't like to waste foil, saran wrap for leftovers. That's why I usually cook JUST ENOUGH.
This is easy and fast.
Mac n Cheese for ONE
Prep Time: 0 min Cook Time: 15 min
Ingredients:
1/2 + cup of macaroni (or other pasta)
1/2 cup milk
1 tbsp flour
1/2 cup shredded cheese
a dash of garlic salt (to taste)
Directions:
Fill a small pot with water and boil on stovetop. When the water boils, throw in the pasta (this can take 7-12 min according to the kind of pasta you use). Strain when done.
While pasta is cooking, whisk milk and flour until there are no lumps. Use the same pot (after you cook pasta) to pour the milk+flour mixture. On medium heat, stir the mixture until it thickens, about 1-2 minutes. Mix in cheese and garlic salt. When cheese melts, mix in the pasta. Done!
Modifications:
Spinach Mac n Cheese - Add frozen spinach after the sauce thickens (before adding cheese)
Bacon Mac n Cheese - Add bacon after the sauce thickens (before adding cheese)
The possibilities are endless...
Notes:
I use a little more than 1/2 cup pasta. You could put in 2/3 cup pasta also.
If you are a big eater, you might want to just make half of the regular recipe instead.
Wednesday, July 16, 2014
Healthy Chicken Salad Sandwich
Today's dinner was a Chicken Salad Sandwich accompanied with a green salad.
Looks ordinary at first. But my husband took one bite of the Chicken Salad Sandwich and exclaimed, "WOW! What did you put in this? It's really good!!"
I just smiled. He started by saying that it didn't taste like a lot of mayo.. I had him guess the secret ingredient. Told him that something was mashed in.
Secret Ingredient??
AVOCADO!!!
Chicken salad sandwich usually comprises of chicken, mayo, and some crunch factor. Replacing mayo for avocado adds healthy fats.
Healthy Chicken Salad Sandwich
Prep Time: 10 minutes
Ingredients:
12.5 oz of chicken white meat (You can buy it in a can at most grocery stores)
1 avocado (I recommend one large avocado or two small ones)
some chopped celery
some mayo (optional: only if your avocado isn't large enough)
2 slices of bread (I use Safeway Brand 15 grain bread)
sea salt and pepper to taste
paprika to taste (optional)
Directions:
In a medium sized bowl, mix chicken, avocado, diced celery. If your avocado is not big enough (like mine, I only had a small avocado on hand), add a tablespoon or two of mayo depending on the consistency. Add sea salt and fresh ground pepper to taste.
Put one slice of bread on the plate. Spread a generous amount of chicken salad. Place the other slice of bread on top.
Easy, tasty dinner (or lunch) !! Serve with a salad.
ENJOY!!!
Note:
I made this a second time but used a large avocado instead. Did not need any mayo then.
So either use one large avocado or two small ones.
Looks ordinary at first. But my husband took one bite of the Chicken Salad Sandwich and exclaimed, "WOW! What did you put in this? It's really good!!"
I just smiled. He started by saying that it didn't taste like a lot of mayo.. I had him guess the secret ingredient. Told him that something was mashed in.
Secret Ingredient??
AVOCADO!!!
Chicken salad sandwich usually comprises of chicken, mayo, and some crunch factor. Replacing mayo for avocado adds healthy fats.
Healthy Chicken Salad Sandwich
Prep Time: 10 minutes
Ingredients:
12.5 oz of chicken white meat (You can buy it in a can at most grocery stores)
1 avocado (I recommend one large avocado or two small ones)
some chopped celery
some mayo (optional: only if your avocado isn't large enough)
2 slices of bread (I use Safeway Brand 15 grain bread)
sea salt and pepper to taste
paprika to taste (optional)
Directions:
In a medium sized bowl, mix chicken, avocado, diced celery. If your avocado is not big enough (like mine, I only had a small avocado on hand), add a tablespoon or two of mayo depending on the consistency. Add sea salt and fresh ground pepper to taste.
Put one slice of bread on the plate. Spread a generous amount of chicken salad. Place the other slice of bread on top.
Easy, tasty dinner (or lunch) !! Serve with a salad.
ENJOY!!!
Note:
I made this a second time but used a large avocado instead. Did not need any mayo then.
So either use one large avocado or two small ones.
Thursday, March 20, 2014
Langostino Tails Sandwich (Lobster Roll)
I love buying Langostino Tails from Trader Joe's. All you have to do is defrost them.
This time, I decided to eat them in a sandwich.
Langostino Tails Roll
Prep Time: 5 min Cook Time: 6 min (if you toast the rolls, otherwise it's 0 min)
Ingredients:
1 12 oz bag of langostino lobster tails (or about 1 lb lobster or crabmeat)
1/2 cup greek yogurt
3 Tbsp mayonnaise
1 stalk celery, chopped into small pieces
sea salt, to taste
fresh ground pepper, to taste
Directions:
Chop a stalk of celery into small pieces.
In a bowl, mix greek yogurt, mayo, celery pieces, langostino tails. Add sea salt and fresh ground pepper (or regular pepper) to taste. Filling is done! (Chill in refrigerator, if desired.)
I bought french rolls for my sandwiches. Open the roll. drizzle olive oil or butter on the inside. Heat the bun with inside side down for about three minute each side.
Take the bun off the pan.
Scoop the filling generously inside the bun.
Note:
One bag of langostino tails makes roughly 3 sandwiches.
Here's an open-faced sandwich:
So simple and delicious!! Enjoy!!
This time, I decided to eat them in a sandwich.
Langostino Tails Roll
Prep Time: 5 min Cook Time: 6 min (if you toast the rolls, otherwise it's 0 min)
Ingredients:
1 12 oz bag of langostino lobster tails (or about 1 lb lobster or crabmeat)
1/2 cup greek yogurt
3 Tbsp mayonnaise
1 stalk celery, chopped into small pieces
sea salt, to taste
fresh ground pepper, to taste
Directions:
Chop a stalk of celery into small pieces.
In a bowl, mix greek yogurt, mayo, celery pieces, langostino tails. Add sea salt and fresh ground pepper (or regular pepper) to taste. Filling is done! (Chill in refrigerator, if desired.)
I bought french rolls for my sandwiches. Open the roll. drizzle olive oil or butter on the inside. Heat the bun with inside side down for about three minute each side.
Take the bun off the pan.
Scoop the filling generously inside the bun.
Note:
One bag of langostino tails makes roughly 3 sandwiches.
Here's an open-faced sandwich:
So simple and delicious!! Enjoy!!
Wednesday, March 5, 2014
Easy Coconut Curry (Basic)
After sifting and sifting through recipe after recipe, I decided that Tina's blog, Oh Snap! Let's eat!, was that one I was going to try. This is the first, of many, curry from scratch recipes that will cook in my kitchen.
I didn't want to buy sauce packets like everyone else. So I'm experimenting. Didn't know it was that easy. Well, I still need practice to get the heat and spices correct or change my curry powder, but it was delicious.
Easy Coconut Chicken Curry (For vegetarians, substitute chicken for veggies)
Prep Time: 20 min Cook Time: 45 minutes
Ingredients:
2 tbsp butter
3 tbsp curry powder (This time, I used Trader Joe's Curry Powder)
1 can coconut milk
1 tsp salt
1 tbsp oil
1 onion, sliced
1 tbsp crushed garlic (Or use 4-5 cloves)
2 lb chicken (I used chopped chicken thighs)
3 medium potatoes, cubed
1 tbsp brown sugar (optional)
1 tsp cayenne
Directions:
In a big pot or pan with medium heat, melt butter. Swirl in curry powder. Pour the coconut milk in and stir some more. Add the salt.
In another pan, heat oil on medium heat. Cook onion slices until softened for about three minutes. Add garlic to cook with the onions. Then add the chicken to cook with the onions and garlic for about 5 minutes. Then add the potatoes to pan. Cook for another 10 minutes.
Now pour the chicken and onions into the other big pot of sauce. Simmer on low heat for half an hour. At the end, stir in some brown sugar and cayenne to your liking. That's it!!! Serve it with your favorite kind of rice (I use brown rice).
I had to add more cayenne since the Trader Joe's curry powder had no kick to it. After the cayenne, it started tasting more like curry to me. I will try many many variations of this basic curry to get the spices down.
Next time, I plan to make my own curry powder. Stay tuned!!
Enjoy!!
I didn't want to buy sauce packets like everyone else. So I'm experimenting. Didn't know it was that easy. Well, I still need practice to get the heat and spices correct or change my curry powder, but it was delicious.
Easy Coconut Chicken Curry (For vegetarians, substitute chicken for veggies)
Prep Time: 20 min Cook Time: 45 minutes
Ingredients:
2 tbsp butter
3 tbsp curry powder (This time, I used Trader Joe's Curry Powder)
1 can coconut milk
1 tsp salt
1 tbsp oil
1 onion, sliced
1 tbsp crushed garlic (Or use 4-5 cloves)
2 lb chicken (I used chopped chicken thighs)
3 medium potatoes, cubed
1 tbsp brown sugar (optional)
1 tsp cayenne
Directions:
In a big pot or pan with medium heat, melt butter. Swirl in curry powder. Pour the coconut milk in and stir some more. Add the salt.
In another pan, heat oil on medium heat. Cook onion slices until softened for about three minutes. Add garlic to cook with the onions. Then add the chicken to cook with the onions and garlic for about 5 minutes. Then add the potatoes to pan. Cook for another 10 minutes.
Now pour the chicken and onions into the other big pot of sauce. Simmer on low heat for half an hour. At the end, stir in some brown sugar and cayenne to your liking. That's it!!! Serve it with your favorite kind of rice (I use brown rice).
I had to add more cayenne since the Trader Joe's curry powder had no kick to it. After the cayenne, it started tasting more like curry to me. I will try many many variations of this basic curry to get the spices down.
Next time, I plan to make my own curry powder. Stay tuned!!
Enjoy!!
Tuesday, February 4, 2014
BEST RIBS EVER (Made AT HOME!!!) - Dry Rub Included
BEST RIBS EVER!!!
Make it at home today.
Up to this day, I never attempted to make baby back ribs. Searched high and low for a dry rub. When I asked friends which dry rub they used, the response was the grocery store bought ones. After poking around recipe land, I found just what I was looking for...
This dry rub utilizes spices that many home cooks have on hand. That's why I love it.
Dry Rub for Meat
Prep Time: 5 minutes
Ingredients:
3 tbsp brown sugar
1 tbsp salt
1 tbsp paprika
1 tbsp ground black pepper
1 tsp garlic powder
1 tsp red pepper (cayenne) - you may omit this if you don't want it to be spicy
Directions:
Stir together and you've created a mix that will make your meats even more delicious!
I ended up making another batch so that I could have a small jar for whenever I need it.
**************************************************************************
BEST RIBS EVER!!!
I'm not exaggerating/kidding when I say that I HAD THE BEST RIBS EVER AT HOME!!! Yes, Yes, IT'S TRUE.
I cook dinner for two. You can increase the pounds of ribs to your liking.
Best Ribs Ever (at Home)
Prep Time: 5 min Bake Time: 3 hr
Marinate: 3 hr (Dry Rub in Refrigerator)
Ingredients:
1 lb pork ribs
dry rub (see above)
1/4 - 1/2 cup BBQ sauce (I put a splash of whiskey in the bbq sauce...heheh)
Directions:
Put dry rub all over the pork ribs one side at a time. Cover with plastic wrap and place it back into the refrigerator. The flavors will seep in more the longer you wait. This can be done overnight (but mine turned out fine after three hours).
Preheat oven to 300F. Place the ribs in a pan with the meat side down. Cover with foil. Bake in the oven for 2.5 hours.
Carefully take out the hot pan and uncover. Slather on the BBQ sauce generously on both sides of the ribs. Now bake with the meat side up. Cover with the foil again.
Bake for another half hour with the BBQ sauce.
Remove from the oven. Smell the aroma of meat and BBQ sauce. Then prepare yourself for RIB HEAVEN!!! WOW... Moist and juicy...finger licking good. I really should have taken a photo after I cut into the ribs so that you could witness the juiciness but I couldn't wait to taste heaven!!!
Ahh...as I am writing about it, I wish I had more ribs next to me to consume. Mmm... Mmm...
Enjoy!!
*Update*
Since making this, I have used the dry rub on chicken and steak.
It's delicious on everything!! I'll have to use the dry rub on pork next time.
Mmm...
Make it at home today.
Up to this day, I never attempted to make baby back ribs. Searched high and low for a dry rub. When I asked friends which dry rub they used, the response was the grocery store bought ones. After poking around recipe land, I found just what I was looking for...
This dry rub utilizes spices that many home cooks have on hand. That's why I love it.
Dry Rub for Meat
Prep Time: 5 minutes
Ingredients:
3 tbsp brown sugar
1 tbsp salt
1 tbsp paprika
1 tbsp ground black pepper
1 tsp garlic powder
1 tsp red pepper (cayenne) - you may omit this if you don't want it to be spicy
Directions:
Stir together and you've created a mix that will make your meats even more delicious!
I ended up making another batch so that I could have a small jar for whenever I need it.
**************************************************************************
BEST RIBS EVER!!!
I'm not exaggerating/kidding when I say that I HAD THE BEST RIBS EVER AT HOME!!! Yes, Yes, IT'S TRUE.
I cook dinner for two. You can increase the pounds of ribs to your liking.
Best Ribs Ever (at Home)
Prep Time: 5 min Bake Time: 3 hr
Marinate: 3 hr (Dry Rub in Refrigerator)
Ingredients:
1 lb pork ribs
dry rub (see above)
1/4 - 1/2 cup BBQ sauce (I put a splash of whiskey in the bbq sauce...heheh)
Directions:
Put dry rub all over the pork ribs one side at a time. Cover with plastic wrap and place it back into the refrigerator. The flavors will seep in more the longer you wait. This can be done overnight (but mine turned out fine after three hours).
Preheat oven to 300F. Place the ribs in a pan with the meat side down. Cover with foil. Bake in the oven for 2.5 hours.
Carefully take out the hot pan and uncover. Slather on the BBQ sauce generously on both sides of the ribs. Now bake with the meat side up. Cover with the foil again.
Bake for another half hour with the BBQ sauce.
Remove from the oven. Smell the aroma of meat and BBQ sauce. Then prepare yourself for RIB HEAVEN!!! WOW... Moist and juicy...finger licking good. I really should have taken a photo after I cut into the ribs so that you could witness the juiciness but I couldn't wait to taste heaven!!!
Ahh...as I am writing about it, I wish I had more ribs next to me to consume. Mmm... Mmm...
Enjoy!!
*Update*
Since making this, I have used the dry rub on chicken and steak.
It's delicious on everything!! I'll have to use the dry rub on pork next time.
Mmm...
Wednesday, December 18, 2013
My Favorite Mac N' Cheese (Macaroni or Other Pasta)
Happy Holidays!!!
I haven't had a post in a while. The good news is that I have cooked this Mac N' Cheese many times now. So it's now a staple that I can make without even glancing at the recipe. The original recipe is from Cooking Light found here. But I modified it.
My Fave Mac N Cheese Recipe
Prep Time: 10 min Cook Time: 25 min
Ingredients:
4 oz sausage (of your choice, chopped)
1 1/4 cup whole milk
2 Tbsp all purpose flour
2 cups cheese
4-5 cups of macaroni (or pasta shape of your choice)
1 tsp garlic salt
Directions:
In a small bowl using a whisk, mix milk and flour until there are no lumps. Set aside.
In a big pot, boil water for your macaroni. I usually leave about 5 inches of space between the water and the top of the pot. If you don't have macaroni on hand, use whatever pasta shape you have. Make this recipe with rotelle, penne, shells, etc. Cook as the package instructs which is usually 8-9 minutes to al dente. Strain the pasta. Set aside.
Using the same big pot (You took out the pasta already. It is in the strainer.), brown chopped sausage on medium heat for 3-4 minutes. This will also create more aroma for your sauce.
Add the milk+flour mixture to the sausage stirring constantly. The sauce will thicken about the next 4-5 minutes. Add the cheeses. I like to use the Mexican Cheese mixture since it has monterey jack, mild cheddar and queso. You can find it in the grocery aisle. Stir until melted. Sprinkle the garlic salt to the sauce. Add cooked macaroni (or pasta). Mix until the sauce it incorporated with the pasta. DONE!!
If you want an element of veggie, you may add chopped spinach like I did.
For a more macaroni-like look, top it with parmesan cheese,
Be creative. At all the gathering where I have brought it my potluck dish, everyone has gobbled it up. When I make it at home for dinner, I see my husband refilling his bowl for seconds...and maybe thirds...lol.
ENJOY!!!
Note: The original recipe calls for some cream cheese but using whole milk already makes it thicker. That's why I omitted it. Also, I don't usually have cream cheese readily available.
I haven't had a post in a while. The good news is that I have cooked this Mac N' Cheese many times now. So it's now a staple that I can make without even glancing at the recipe. The original recipe is from Cooking Light found here. But I modified it.
My Fave Mac N Cheese Recipe
Prep Time: 10 min Cook Time: 25 min
Ingredients:
4 oz sausage (of your choice, chopped)
1 1/4 cup whole milk
2 Tbsp all purpose flour
2 cups cheese
4-5 cups of macaroni (or pasta shape of your choice)
1 tsp garlic salt
Directions:
In a small bowl using a whisk, mix milk and flour until there are no lumps. Set aside.
In a big pot, boil water for your macaroni. I usually leave about 5 inches of space between the water and the top of the pot. If you don't have macaroni on hand, use whatever pasta shape you have. Make this recipe with rotelle, penne, shells, etc. Cook as the package instructs which is usually 8-9 minutes to al dente. Strain the pasta. Set aside.
Using the same big pot (You took out the pasta already. It is in the strainer.), brown chopped sausage on medium heat for 3-4 minutes. This will also create more aroma for your sauce.
Add the milk+flour mixture to the sausage stirring constantly. The sauce will thicken about the next 4-5 minutes. Add the cheeses. I like to use the Mexican Cheese mixture since it has monterey jack, mild cheddar and queso. You can find it in the grocery aisle. Stir until melted. Sprinkle the garlic salt to the sauce. Add cooked macaroni (or pasta). Mix until the sauce it incorporated with the pasta. DONE!!
If you want an element of veggie, you may add chopped spinach like I did.
For a more macaroni-like look, top it with parmesan cheese,
Be creative. At all the gathering where I have brought it my potluck dish, everyone has gobbled it up. When I make it at home for dinner, I see my husband refilling his bowl for seconds...and maybe thirds...lol.
ENJOY!!!
Note: The original recipe calls for some cream cheese but using whole milk already makes it thicker. That's why I omitted it. Also, I don't usually have cream cheese readily available.
Friday, October 11, 2013
Hearty Shredded Cabbage, Potato, Celery Soup
In Southern California, we are blessed with sunshine year round. This week, we experienced the beginning of fall nights. (We still have beautiful sunshine in the daytime.) Perfect weather for hearty soups! Originally when I bought the cabbage, I had planned on putting it in my carnitas tacos but on the days I made them, I was too hungry, and a bit lazy. There was no cabbage in my carnitas tacos.
With the real beginning of fall made me think of making warm soup for the nights. Usually my recipes come about with the ingredients I have at hand. You can add your own veggies and modify the soup. You will need a big pot.
Hearty Shredded Cabbage Soup
Prep Time: 30 minutes Cook Time: 1-2 hours
Ingredients:
2-3 tbsp butter
1 onion, chopped
1 can beef broth (You can use chicken or vegetable if you like.)
8 cups water
1 small head of cabbage
3 potatoes, diced
1 celery stalk, chopped
1 tsp dillweed
1 tsp salt
1/2 tsp garlic salt
fresh ground black pepper to taste
bacon (optional)
Directions:
Place the butter in the pot to melt. Add the onions. Caramelize for about eight minutes.
Add the broth and water. Then all of your chopped veggies go in the pot also with the rest of the ingredients. The soup should cook for at least an hour.
Meanwhile, I decided to add meat. But my pot was very full. The only option at that point was to grilled some bacon. In a pan, I grilled my bacon on medium heat. Cut the bacon in smaller pieces before you add it to the soup. Place it in the pot with the soup and stir. Continue cooking the soup.
Warm and hearty soup.. It will leave you wanting to grab another bowl. No worries; there is plenty in the pot!!
Thursday, April 25, 2013
Chinese Lion's Head Meatball
Chinese Lion's Head Meatball is one of my favorite dishes. My grandma would make this for me every time she saw me since she knew that I loved it that much. Funny that I've made Italian meatballs but not the Chinese kind until now. It is just making meatballs with asian seasonings.
Traditionally, these meatballs are supposed to be as big as possible like a lion's head; however, I like to make them smaller since cooking time is shorter for browning them.
Chinese Lion's Head Meatball (Soup)
Prep Time: 20 min Cook Time:
Ingredients:
1 lb ground pork
1/4 tsp white pepper
1 tsp salt
2 tsp sugar
2 Tbsp cornstarch
2 green onions
2 tsp ginger (minced)
2 tsp soy sauce
2 tsp cooking wine
1 egg
sesame oil (or peanut oil)
Directions:
In a mixing bowl, put the ground meat in. Add salt, white pepper, sugar, cornstarch, cooking wine, soy sauce, green onions, ginger, and 1 beaten egg. Mix in a circular motion until all of the ingredients are incorporated. Wet your hands, then form the meatballs into the desired size. Traditionally, the lion's heads are to be as big as you can get it. However, it will take more time to cook if your meatballs are too big. I like to keep it to roughly 1.5 - 2 inches in diameter.
In a pan, pour a couple teaspoons of sesame oil (usually it's peanut oil, but I don't have it on hand). Place the meatballs in the pan after you heat the oil. Brown the meatballs on all sides which takes about 10 minutes. You do not have to fully cook the meatballs since you will be braising it with the napa cabbage later.
To make the soup:
Put two cans of chicken broth in a big pot. Add as much napa cabbage as you like. I put in a whole small head of napa cabbage. Place the meatballs on top of the napa cabbage. If you would like, you can add other things. I cut some bamboo shoot to throw in along with some ginger to for the soup also. You can put mushrooms, etc. Braise on medium heat for about half an hour.
If you would like glass noodles, soak the clear noodles in a bowl with water for half an hour. Drain the noodles. Add them last when you are about done cooking.
Put two cans of chicken broth in a big pot. Add as much napa cabbage as you like. I put in a whole small head of napa cabbage. Place the meatballs on top of the napa cabbage. If you would like, you can add other things. I cut some bamboo shoot to throw in along with some ginger to for the soup also. You can put mushrooms, etc. Braise on medium heat for about half an hour.
If you would like glass noodles, soak the clear noodles in a bowl with water for half an hour. Drain the noodles. Add them last when you are about done cooking.
Tuesday, March 5, 2013
Spaghetti & Meatballs
My husband LOVES LOVES LOVES spaghetti and meatballs.
One of our Valentine's Week dinners (Yes, I made it a week of cooking...hehe) this year was Spaghetti & Meatballs. He was all touched that I made homemade meatballs just for him. (Well, it's for ME too...haha) Thought I would try the recipe called Meatball Nirvana. I followed the recipe to make my delicious meatballs. The change I made was to use 1/3 cup of oatmeal for the breadcrumbs (and maybe more onions).
Homemade Meatballs
Ingredients:
1 lb ground beef
1/2 tsp sea salt
1/2 cup onion (diced)
1/2 tsp garlic salt
1 1/2 tsp italian seasoning
3/4 tsp red pepper flakes
3/4 tsp oregano
1 1/2 Tbsp Worcestershire sauce
1/3 cup oatmeal
1/3 cup milk
some hot sauce (I used Tapatio)
Directions:
Preheat the oven to 400F. In a medium sized bowl, mix ground beef with the onion and dry seasonings first. Then add Worcheshire sauce, milk, oatmeal, some hot sauce. Once all the ingredients are incorporated, you are ready to create the meatballs.
I lined a pan with aluminum foil to make it easier to clean.
Form meatballs with your hands. Make them about 1.5 inches in diameter. I'm sure you can use an ice cream scoop for size control but it's not hard to do with your hands.
There were twelve of them. (The other three were in a smaller pan, not pictured.) Cook your spaghetti per the directions. Heat up your sauce in another little pot. I liked keeping the meatballs separate from the tomato sauce. When serving, put some spaghetti on the plate, then the meatballs. Lastly, pour some sauce over it.
Meatball Nirvana is definitely a keeper!!
Enjoy!!
One of our Valentine's Week dinners (Yes, I made it a week of cooking...hehe) this year was Spaghetti & Meatballs. He was all touched that I made homemade meatballs just for him. (Well, it's for ME too...haha) Thought I would try the recipe called Meatball Nirvana. I followed the recipe to make my delicious meatballs. The change I made was to use 1/3 cup of oatmeal for the breadcrumbs (and maybe more onions).
Homemade Meatballs
Ingredients:
1 lb ground beef
1/2 tsp sea salt
1/2 cup onion (diced)
1/2 tsp garlic salt
1 1/2 tsp italian seasoning
3/4 tsp red pepper flakes
3/4 tsp oregano
1 1/2 Tbsp Worcestershire sauce
1/3 cup oatmeal
1/3 cup milk
some hot sauce (I used Tapatio)
Directions:
Preheat the oven to 400F. In a medium sized bowl, mix ground beef with the onion and dry seasonings first. Then add Worcheshire sauce, milk, oatmeal, some hot sauce. Once all the ingredients are incorporated, you are ready to create the meatballs.
I lined a pan with aluminum foil to make it easier to clean.
Form meatballs with your hands. Make them about 1.5 inches in diameter. I'm sure you can use an ice cream scoop for size control but it's not hard to do with your hands.
Bake in the oven for 25 minutes.
Meatballs are cooked!! Thought I would show this picture since the finished dish has spaghetti sauce on top.
Meatball Nirvana is definitely a keeper!!
Enjoy!!
Wednesday, February 20, 2013
Chicken Parmigiana
I'm in an Italian food phase. Tonight I cooked Chicken Parmigiana adapted from the Pioneer Woman (I love her!!). Didn't do everything the recipe called for like hammering the meat to make it thinner. My chicken was almost 1.5 inches thick!! But it was tasty and tender.
Chicken Parmigiana
Prep Time: 10 minutes Cook Time: 35 minutes
Ingredients:
2 chicken breasts
some olive oil
some flour
1 onion, diced
2 Tbsp butter
14 oz tomato sauce (I use Ragu Pasta Sauce)
some tomatoes
some olive oil
some parmesan cheese (or other cheese you would like to melt on top of the chicken like pecorino, mozzarella cheese)
3/4 cup wine (I used red but either red or white would work)
Directions:
Season your chicken breast first. Some salt, pepper, lemon on both sides. Then put some flour on a big plate. Coat the chicken breast by placing it into the flour. Flip the chicken breast and repeat until it is covered evenly in flour. Do the same for the second breast.
In a big pan with a lid (I don't think you need a lid but I was avoiding splatter), heat about a tablespoon of oil (more if you like). Melt butter also. I fried my floured chicken breasts six minutes per side because they were about 1 1/4 inch thick!! (If your chicken breast are about half an inch thick, three minutes will suffice. If they are 3/4 of an inch thick, about four minutes would be enough. It depends on the thickness of your chicken.) Once you have a nice golden brown on both sides, remove from heat.
*Note: Don't forget to boil water for your thin spaghetti noodles (or your choice) at this time.
Using the same big pan with drippings and all, saute the diced onions for about three minutes. Pour in the wine. Stir and cook until about half of the wine has disappeared (Not from you drinking it..). After about four minutes, throw in the tomatoes. I had orange cherry tomatoes on hand that I cut in half. Pour in the tomato sauce. Stir well. Cover with a lid to let it simmer for 10 minutes. Remove lid and stir again before allowing it to simmer with the lid on for another 10 minutes.
Place the fried chicken breasts into the sauce.
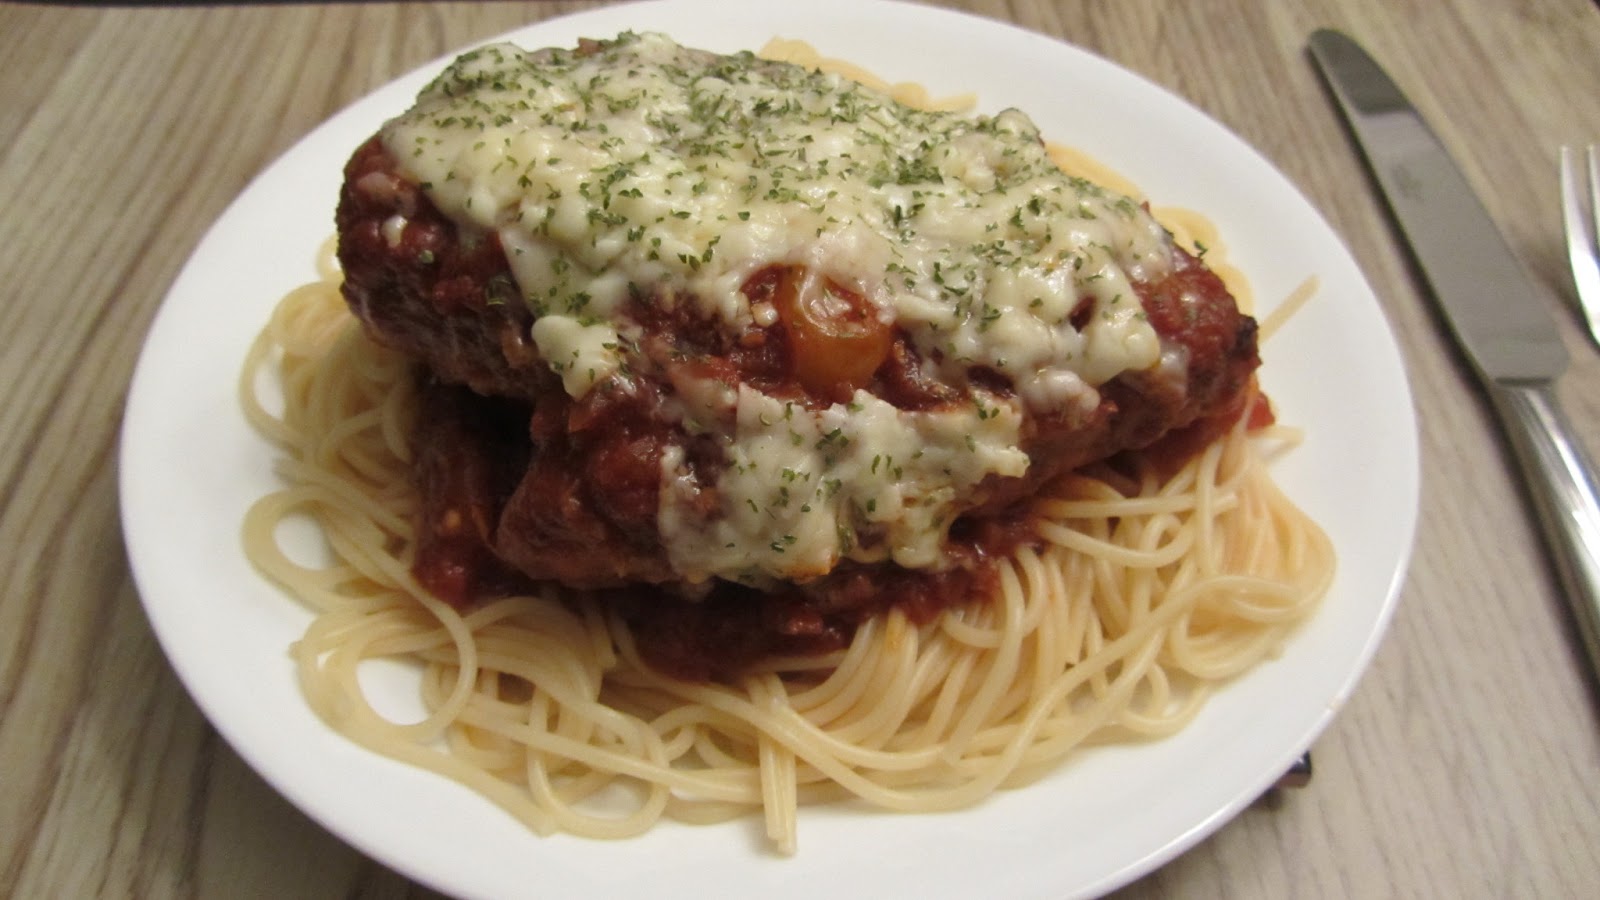
Spoon the sauce around the chicken breast on top to cover the whole breast. Top it with cheese generously. I didn't have fresh parsley so I added some parsley in a spice jar instead.
Plate noodles. Add some sauce before you lay down the chicken breast. Carefully lay the chicken breast (Mine was HUGE) on top of the pasta. I was surprised at how gigantic my chicken parmigiana became.
It was moist, juicy, and flavorful. My husband said that the sauce tasted like it was homemade. It was definitely the wine factor. heheh.
Enjoy!!
Chicken Parmigiana
Prep Time: 10 minutes Cook Time: 35 minutes
Ingredients:
2 chicken breasts
some olive oil
some flour
1 onion, diced
2 Tbsp butter
14 oz tomato sauce (I use Ragu Pasta Sauce)
some tomatoes
some olive oil
some parmesan cheese (or other cheese you would like to melt on top of the chicken like pecorino, mozzarella cheese)
3/4 cup wine (I used red but either red or white would work)
Directions:
Season your chicken breast first. Some salt, pepper, lemon on both sides. Then put some flour on a big plate. Coat the chicken breast by placing it into the flour. Flip the chicken breast and repeat until it is covered evenly in flour. Do the same for the second breast.
In a big pan with a lid (I don't think you need a lid but I was avoiding splatter), heat about a tablespoon of oil (more if you like). Melt butter also. I fried my floured chicken breasts six minutes per side because they were about 1 1/4 inch thick!! (If your chicken breast are about half an inch thick, three minutes will suffice. If they are 3/4 of an inch thick, about four minutes would be enough. It depends on the thickness of your chicken.) Once you have a nice golden brown on both sides, remove from heat.
*Note: Don't forget to boil water for your thin spaghetti noodles (or your choice) at this time.
Using the same big pan with drippings and all, saute the diced onions for about three minutes. Pour in the wine. Stir and cook until about half of the wine has disappeared (Not from you drinking it..). After about four minutes, throw in the tomatoes. I had orange cherry tomatoes on hand that I cut in half. Pour in the tomato sauce. Stir well. Cover with a lid to let it simmer for 10 minutes. Remove lid and stir again before allowing it to simmer with the lid on for another 10 minutes.
Place the fried chicken breasts into the sauce.
Spoon the sauce around the chicken breast on top to cover the whole breast. Top it with cheese generously. I didn't have fresh parsley so I added some parsley in a spice jar instead.
Plate noodles. Add some sauce before you lay down the chicken breast. Carefully lay the chicken breast (Mine was HUGE) on top of the pasta. I was surprised at how gigantic my chicken parmigiana became.
It was moist, juicy, and flavorful. My husband said that the sauce tasted like it was homemade. It was definitely the wine factor. heheh.
Enjoy!!
Friday, February 15, 2013
Healthy Meatloaf with Oatmeal
I have posted Turkey-Quinoa Meatloaf before. Traditionally, there are breadcrumbs in meatloaf; however, many people do not have the ingredient on hand. Sifting through various recipes, I finally decided to use a combination of recipes.
Healthy Meatloaf with Oatmeal
Ingredients:
1 lb ground meat
1 onion (chopped)
1 egg
1/3 cup oatmeal
1/2 cup of ketchup
4 Tbsp Dijon mustard
1/2 tsp oregano
1/2 tsp salt
1/2 tsp pepper
ketchup mixture = ketchup + dijon mustard
Preheat oven to 350F. Mix all ingredients in a medium sized bowl except for about three tablespoons of the ketchup mixture.
Place in an 8x8 pan. Top with the leftover ketchup mixture.
Bake for 40 minutes. Let it sit for five minutes.
Cut and serve.
Enjoy!!
Subscribe to:
Posts (Atom)


