For Black Friday 2016, I only had one thing I was eyeing to buy since I had been wanting for for months...an Instant Pot. It arrived a week later. Then the box sat in the closet through the holidays while we were away. My goal was to use it by the end of January. Well, mid-February rolled around, it was still in the box until today...
I had been afraid to use it. Woke up this morning and told myself that today was the day I was going to tackle my new appliance. The manual felt thick until I read it realizing that it was that way since it was translated into several different languages (otherwise it would have been thin).
Still unsure of what to make but knowing that it was going to be chicken for the first recipe. I defrosted chicken in the sink during the day (But you can cook frozen chicken in Instant Pot too). Kept reading that it would be done in 5 minutes. Ended up taking much longer than anticipated. Dinner was fairly late for us as a result. Chicken was flavorful and tender but not something I couldn't make in comparable time. Felt that I was extra cautious since it was my FIRST TIME with my Instant Pot.
Yes, it takes 5 minutes on high pressure to make chicken but I set it on 8 minutes since I had 8 chicken thighs that were thick. Used two functions for my dish: 1) Saute 2) Poultry.
Honey Garlic Chicken (Using Instant Pot)
Ingredients:
2-3 lbs Chicken Thighs
salt and pepper to season OR dry rub
1/2 cup water
1/2 cup honey
1/2 cup soy sauce
1/4 cup ketchup
5 cloves garlic, chopped/minced
1 tsp basil
olive oil (for saute)
1 lb carrots
Directions:
Sprinkle dry rub on both sides of the chicken thighs (or just use salt and pepper).
In a separate bowl, mix water, honey, soy sauce, ketchup, garlic, basil.
Plug in your Instant Pot. With the lid off, put some olive oil to brown the chicken. Push the 'Saute' button. Cook chicken for a minute each side. Place it on a plate when done (found that I could brown 2-3 chicken thighs at a time due to space).
Put browned chicken thighs back into Instant Pot. The carrots will go on top of the chicken. Pour liquids from the separate bowl. Place and lock Instant Pot lid. Make sure the top of your pot is set to 'Sealed' (not 'Vent').
Push the 'Poultry' button. I set it on 8 minutes (recipe called for 5 minutes) since my chicken pieces were thicker.
Done.
I stood there staring at it for 5 minutes afraid to change the 'Sealed' to 'Vent' for quick pressure release. Moved it a little at a time for slow pressure release (my first time!!). Ended up switching to 'Vent' by using a spoon instead since I didn't want to get too close.
The result was tender chicken. Started with a simple chicken dish to test the waters.
How was your FIRST TIME using your Instant Pot?? What recipe did you use?
Notes:
1) It didn't take just 8 minutes since it takes time to reach high pressure.
2) When you saute, you cook like you normally do in a pan.
3) Easy to use but I was still nervous since I had heard stories of people putting holes in their ceilings with pressure cookers.
Healthy meets Delicious.. They fall in LOVE!! ;) *Click on the pictures to enlarge.
Showing posts with label Chicken. Show all posts
Friday, February 17, 2017
Friday, March 7, 2014
Paleo Fried Chicken (Almond Meal/Flour)
Believe it or not, this was my first time making fried chicken. It's probably because I'm into healthier cooking. Frying just wasn't my thing. But I have become a fan of Paleo Fried Chicken after consuming the deliciousness of my creation.
All the recipes pretty much look the same. You can use butter or oil to fry the chicken.
Paleo Fried Chicken (Note: I cook for two adults. You can alter accordingly)
Prep Time: 15 min Cook time: 15 min
Ingredients:
3/4 cup almond meal/flour
1 tsp paprika
1/2 tsp garlic salt
1/2 tsp black pepper
a dash of cayenne (optional)
1 egg
2 chicken thighs
6 tbsp unsalted butter
Directions:
Dip the chicken thigh, one at a time, in the bowl with the egg. Make sure it isn't dripping anymore. Then place the chicken thigh on the plate with the almond flour mixture. Bread both sides of the chicken thigh evenly. Do the same thing to the other one.
I put it in the refrigerator to set better.
In a big pan, melt the butter on medium heat. Carefully place the chicken thighs as flat as possible into the pan. Let it cook until the breading is crispy. For me, this took about 8 minutes. Flip them to crisp the other side. Finish cooking for about 7 minutes.
I paired my fried chicken with asparagus. Think I'll be making fried chicken more often...
Enjoy!!
All the recipes pretty much look the same. You can use butter or oil to fry the chicken.
Paleo Fried Chicken (Note: I cook for two adults. You can alter accordingly)
Prep Time: 15 min Cook time: 15 min
Ingredients:
3/4 cup almond meal/flour
1 tsp paprika
1/2 tsp garlic salt
1/2 tsp black pepper
a dash of cayenne (optional)
1 egg
2 chicken thighs
6 tbsp unsalted butter
Directions:
Whisk an egg in a bowl.
On a big plate, add almond flour and all the spices.
Mix well.
Dip the chicken thigh, one at a time, in the bowl with the egg. Make sure it isn't dripping anymore. Then place the chicken thigh on the plate with the almond flour mixture. Bread both sides of the chicken thigh evenly. Do the same thing to the other one.
I put it in the refrigerator to set better.
In a big pan, melt the butter on medium heat. Carefully place the chicken thighs as flat as possible into the pan. Let it cook until the breading is crispy. For me, this took about 8 minutes. Flip them to crisp the other side. Finish cooking for about 7 minutes.
I paired my fried chicken with asparagus. Think I'll be making fried chicken more often...
Enjoy!!
Wednesday, March 5, 2014
Easy Coconut Curry (Basic)
After sifting and sifting through recipe after recipe, I decided that Tina's blog, Oh Snap! Let's eat!, was that one I was going to try. This is the first, of many, curry from scratch recipes that will cook in my kitchen.
I didn't want to buy sauce packets like everyone else. So I'm experimenting. Didn't know it was that easy. Well, I still need practice to get the heat and spices correct or change my curry powder, but it was delicious.
Easy Coconut Chicken Curry (For vegetarians, substitute chicken for veggies)
Prep Time: 20 min Cook Time: 45 minutes
Ingredients:
2 tbsp butter
3 tbsp curry powder (This time, I used Trader Joe's Curry Powder)
1 can coconut milk
1 tsp salt
1 tbsp oil
1 onion, sliced
1 tbsp crushed garlic (Or use 4-5 cloves)
2 lb chicken (I used chopped chicken thighs)
3 medium potatoes, cubed
1 tbsp brown sugar (optional)
1 tsp cayenne
Directions:
In a big pot or pan with medium heat, melt butter. Swirl in curry powder. Pour the coconut milk in and stir some more. Add the salt.
In another pan, heat oil on medium heat. Cook onion slices until softened for about three minutes. Add garlic to cook with the onions. Then add the chicken to cook with the onions and garlic for about 5 minutes. Then add the potatoes to pan. Cook for another 10 minutes.
Now pour the chicken and onions into the other big pot of sauce. Simmer on low heat for half an hour. At the end, stir in some brown sugar and cayenne to your liking. That's it!!! Serve it with your favorite kind of rice (I use brown rice).
I had to add more cayenne since the Trader Joe's curry powder had no kick to it. After the cayenne, it started tasting more like curry to me. I will try many many variations of this basic curry to get the spices down.
Next time, I plan to make my own curry powder. Stay tuned!!
Enjoy!!
I didn't want to buy sauce packets like everyone else. So I'm experimenting. Didn't know it was that easy. Well, I still need practice to get the heat and spices correct or change my curry powder, but it was delicious.
Easy Coconut Chicken Curry (For vegetarians, substitute chicken for veggies)
Prep Time: 20 min Cook Time: 45 minutes
Ingredients:
2 tbsp butter
3 tbsp curry powder (This time, I used Trader Joe's Curry Powder)
1 can coconut milk
1 tsp salt
1 tbsp oil
1 onion, sliced
1 tbsp crushed garlic (Or use 4-5 cloves)
2 lb chicken (I used chopped chicken thighs)
3 medium potatoes, cubed
1 tbsp brown sugar (optional)
1 tsp cayenne
Directions:
In a big pot or pan with medium heat, melt butter. Swirl in curry powder. Pour the coconut milk in and stir some more. Add the salt.
In another pan, heat oil on medium heat. Cook onion slices until softened for about three minutes. Add garlic to cook with the onions. Then add the chicken to cook with the onions and garlic for about 5 minutes. Then add the potatoes to pan. Cook for another 10 minutes.
Now pour the chicken and onions into the other big pot of sauce. Simmer on low heat for half an hour. At the end, stir in some brown sugar and cayenne to your liking. That's it!!! Serve it with your favorite kind of rice (I use brown rice).
I had to add more cayenne since the Trader Joe's curry powder had no kick to it. After the cayenne, it started tasting more like curry to me. I will try many many variations of this basic curry to get the spices down.
Next time, I plan to make my own curry powder. Stay tuned!!
Enjoy!!
Wednesday, February 20, 2013
Chicken Parmigiana
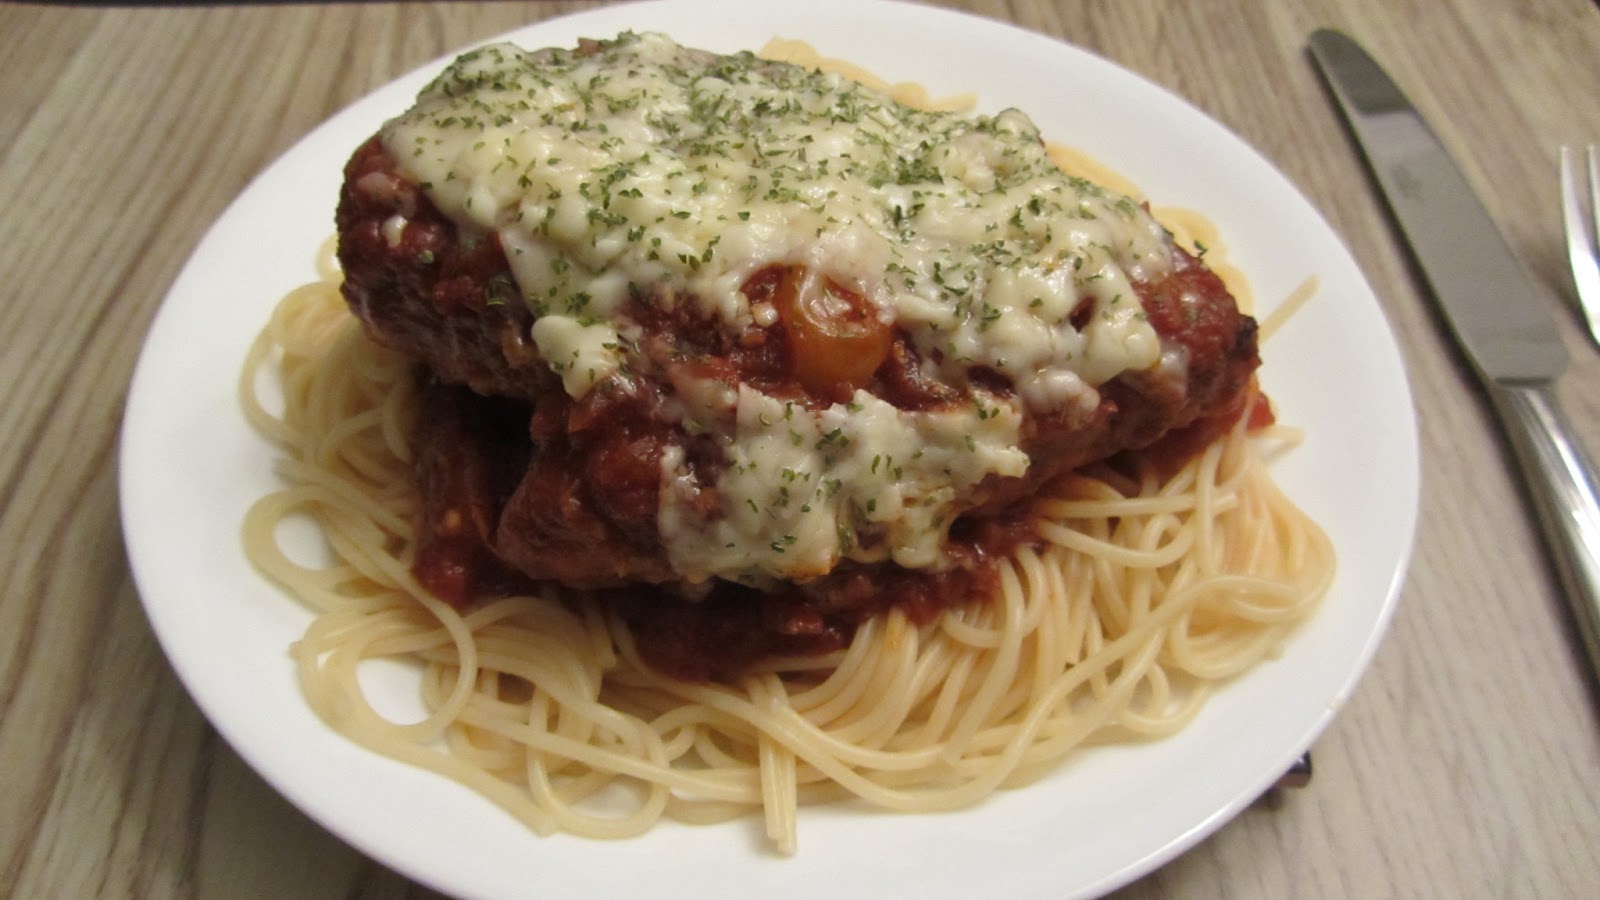
I'm in an Italian food phase. Tonight I cooked Chicken Parmigiana adapted from the Pioneer Woman (I love her!!). Didn't do everything the recipe called for like hammering the meat to make it thinner. My chicken was almost 1.5 inches thick!! But it was tasty and tender.
Chicken Parmigiana
Prep Time: 10 minutes Cook Time: 35 minutes
Ingredients:
2 chicken breasts
some olive oil
some flour
1 onion, diced
2 Tbsp butter
14 oz tomato sauce (I use Ragu Pasta Sauce)
some tomatoes
some olive oil
some parmesan cheese (or other cheese you would like to melt on top of the chicken like pecorino, mozzarella cheese)
3/4 cup wine (I used red but either red or white would work)
Directions:
Season your chicken breast first. Some salt, pepper, lemon on both sides. Then put some flour on a big plate. Coat the chicken breast by placing it into the flour. Flip the chicken breast and repeat until it is covered evenly in flour. Do the same for the second breast.
In a big pan with a lid (I don't think you need a lid but I was avoiding splatter), heat about a tablespoon of oil (more if you like). Melt butter also. I fried my floured chicken breasts six minutes per side because they were about 1 1/4 inch thick!! (If your chicken breast are about half an inch thick, three minutes will suffice. If they are 3/4 of an inch thick, about four minutes would be enough. It depends on the thickness of your chicken.) Once you have a nice golden brown on both sides, remove from heat.
*Note: Don't forget to boil water for your thin spaghetti noodles (or your choice) at this time.
Using the same big pan with drippings and all, saute the diced onions for about three minutes. Pour in the wine. Stir and cook until about half of the wine has disappeared (Not from you drinking it..). After about four minutes, throw in the tomatoes. I had orange cherry tomatoes on hand that I cut in half. Pour in the tomato sauce. Stir well. Cover with a lid to let it simmer for 10 minutes. Remove lid and stir again before allowing it to simmer with the lid on for another 10 minutes.
Place the fried chicken breasts into the sauce.
Spoon the sauce around the chicken breast on top to cover the whole breast. Top it with cheese generously. I didn't have fresh parsley so I added some parsley in a spice jar instead.
Plate noodles. Add some sauce before you lay down the chicken breast. Carefully lay the chicken breast (Mine was HUGE) on top of the pasta. I was surprised at how gigantic my chicken parmigiana became.
It was moist, juicy, and flavorful. My husband said that the sauce tasted like it was homemade. It was definitely the wine factor. heheh.
Enjoy!!
Chicken Parmigiana
Prep Time: 10 minutes Cook Time: 35 minutes
Ingredients:
2 chicken breasts
some olive oil
some flour
1 onion, diced
2 Tbsp butter
14 oz tomato sauce (I use Ragu Pasta Sauce)
some tomatoes
some olive oil
some parmesan cheese (or other cheese you would like to melt on top of the chicken like pecorino, mozzarella cheese)
3/4 cup wine (I used red but either red or white would work)
Directions:
Season your chicken breast first. Some salt, pepper, lemon on both sides. Then put some flour on a big plate. Coat the chicken breast by placing it into the flour. Flip the chicken breast and repeat until it is covered evenly in flour. Do the same for the second breast.
In a big pan with a lid (I don't think you need a lid but I was avoiding splatter), heat about a tablespoon of oil (more if you like). Melt butter also. I fried my floured chicken breasts six minutes per side because they were about 1 1/4 inch thick!! (If your chicken breast are about half an inch thick, three minutes will suffice. If they are 3/4 of an inch thick, about four minutes would be enough. It depends on the thickness of your chicken.) Once you have a nice golden brown on both sides, remove from heat.
*Note: Don't forget to boil water for your thin spaghetti noodles (or your choice) at this time.
Using the same big pan with drippings and all, saute the diced onions for about three minutes. Pour in the wine. Stir and cook until about half of the wine has disappeared (Not from you drinking it..). After about four minutes, throw in the tomatoes. I had orange cherry tomatoes on hand that I cut in half. Pour in the tomato sauce. Stir well. Cover with a lid to let it simmer for 10 minutes. Remove lid and stir again before allowing it to simmer with the lid on for another 10 minutes.
Place the fried chicken breasts into the sauce.
Spoon the sauce around the chicken breast on top to cover the whole breast. Top it with cheese generously. I didn't have fresh parsley so I added some parsley in a spice jar instead.
Plate noodles. Add some sauce before you lay down the chicken breast. Carefully lay the chicken breast (Mine was HUGE) on top of the pasta. I was surprised at how gigantic my chicken parmigiana became.
It was moist, juicy, and flavorful. My husband said that the sauce tasted like it was homemade. It was definitely the wine factor. heheh.
Enjoy!!
Thursday, February 2, 2012
Simmering Chicken in Soy Sauce
This is a simple recipe that produces moist, flavorful chicken. Personally, I don't like my food too salty. That is why I add so much water in my recipe.
Simmering Chicken in Soy Sauce:
Prep Time: 5 minutes Cook Time: 45 minutes
Ingredients:
8 Chicken Drumsticks (You can also use thigh, breast, etc.)
1 cup soy sauce
5 cups water
1/2 cup cooking wine
scallions (optional)
ginger (optional)
Directions:
Grab a big pot with a lid. Add the water, soy sauce, and cooking wine. Place the chicken in the pot also. (You can more than 8 drumsticks. Chicken should be immersed in the liquid. If it isn't, don't worry. Halfway into cooking just flip the chicken so that the other side has its share of flavor.) If desired, chop the scallions or slice ginger before adding it in the pot. Heat on high with lid for about 45 minutes.
Transfer cooked chicken to a plate/bowl. That's all there is to it. Smells and tastes delicious! I like to eat my chicken with brown rice. Usually, I will cook a simple veggie dish to hit another food group.
Enjoy!!
Simmering Chicken in Soy Sauce:
Prep Time: 5 minutes Cook Time: 45 minutes
Ingredients:
8 Chicken Drumsticks (You can also use thigh, breast, etc.)
1 cup soy sauce
5 cups water
1/2 cup cooking wine
scallions (optional)
ginger (optional)
Directions:
Grab a big pot with a lid. Add the water, soy sauce, and cooking wine. Place the chicken in the pot also. (You can more than 8 drumsticks. Chicken should be immersed in the liquid. If it isn't, don't worry. Halfway into cooking just flip the chicken so that the other side has its share of flavor.) If desired, chop the scallions or slice ginger before adding it in the pot. Heat on high with lid for about 45 minutes.
Transfer cooked chicken to a plate/bowl. That's all there is to it. Smells and tastes delicious! I like to eat my chicken with brown rice. Usually, I will cook a simple veggie dish to hit another food group.
Enjoy!!
Subscribe to:
Posts (Atom)